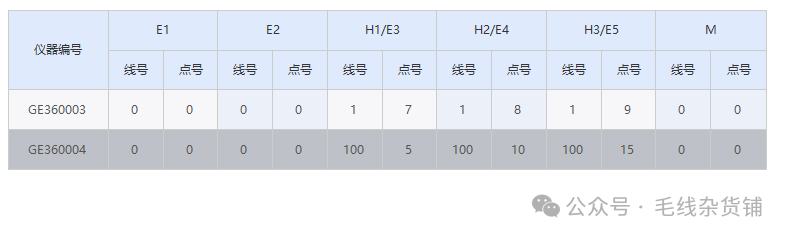
其实有很多第三方控件已经有实现类似的功能,但是基本收费,那我们就可以通过对DataGridView控件加一部分自绘的方式,去实现图中的效果。 private void DataGridView1_Paint(object sender, PaintEventArgs e) { using (StringFormat sf = new StringFormat { Alignment = StringAlignment.Center, LineAlignment = StringAlignment.Center }) using (Pen pen = new Pen(dataGridView1.GridColor, 1)) using (Brush bgBrush = new SolidBrush(dataGridView1.ColumnHeadersDefaultCellStyle.BackColor)) using (Brush fontBrush = new SolidBrush(dataGridView1.ColumnHeadersDefaultCellStyle.ForeColor)) { Rectangle col1 = dataGridView1.GetCellDisplayRectangle(1, -1, false); if (!col1.IsEmpty) { int midY = col1.Top + col1.Height / 2; e.Graphics.DrawLine(pen, col1.Right - 1, col1.Top, col1.Right - 1, midY); }
foreach (var group in _headerGroups) { Rectangle first = dataGridView1.GetCellDisplayRectangle(group.StartColumn, -1, false); Rectangle last = dataGridView1.GetCellDisplayRectangle(group.EndColumn, -1, false); if (first.IsEmpty || last.IsEmpty) continue;
Rectangle topRect = Rectangle.FromLTRB(first.Left, first.Top, last.Right, first.Top + first.Height / 2);
e.Graphics.FillRectangle(bgBrush, topRect); e.Graphics.DrawString(group.HeaderText, dataGridView1.ColumnHeadersDefaultCellStyle.Font, fontBrush, topRect, sf); e.Graphics.DrawLine(pen, topRect.Right - 1, topRect.Top, topRect.Right - 1, topRect.Top + topRect.Height - 1); }
Rectangle hFirst = dataGridView1.GetCellDisplayRectangle(1, -1, false); Rectangle hLast = dataGridView1.GetCellDisplayRectangle(13, -1, false); if (!hFirst.IsEmpty && !hLast.IsEmpty) { e.Graphics.DrawLine(pen, hFirst.Left, hFirst.Top, hLast.Right, hLast.Top); } } }
private void DataGridView1_CellPainting(object sender, DataGridViewCellPaintingEventArgs e) { if (e.RowIndex == -1 && e.ColumnIndex >= 0) { if (e.ColumnIndex == 1) { e.PaintBackground(e.CellBounds, true); using (StringFormat sf = new StringFormat { Alignment = StringAlignment.Center, LineAlignment = StringAlignment.Center }) using (Pen pen = new Pen(dataGridView1.GridColor, 1)) using (Brush fontBrush = new SolidBrush(dataGridView1.ColumnHeadersDefaultCellStyle.ForeColor)) { e.Graphics.DrawString("仪器编号", dataGridView1.ColumnHeadersDefaultCellStyle.Font, fontBrush, e.CellBounds, sf);
int midY1 = e.CellBounds.Top + e.CellBounds.Height / 2; e.Graphics.DrawLine(pen, e.CellBounds.Right - 1, midY1, e.CellBounds.Right - 1, e.CellBounds.Bottom); e.Graphics.DrawLine(pen, e.CellBounds.Left, e.CellBounds.Bottom - 1, e.CellBounds.Right, e.CellBounds.Bottom - 1); } e.Handled = true; return; }
HeaderGroup group = FindGroup(e.ColumnIndex); if (group == null) return;
e.PaintBackground(e.CellBounds, true);
int midY = e.CellBounds.Top + e.CellBounds.Height / 2; Rectangle subRect = new Rectangle(e.CellBounds.Left, midY, e.CellBounds.Width, e.CellBounds.Height - e.CellBounds.Height / 2);
using (StringFormat sf = new StringFormat { Alignment = StringAlignment.Center, LineAlignment = StringAlignment.Center }) using (Pen pen = new Pen(dataGridView1.GridColor, 1)) using (Brush fontBrush = new SolidBrush(dataGridView1.ColumnHeadersDefaultCellStyle.ForeColor)) { string subText = e.ColumnIndex < _subHeaders.Length ? _subHeaders[e.ColumnIndex] : ""; e.Graphics.DrawString(subText, dataGridView1.ColumnHeadersDefaultCellStyle.Font, fontBrush, subRect, sf);
e.Graphics.DrawLine(pen, e.CellBounds.Left, midY, e.CellBounds.Right, midY);
e.Graphics.DrawLine(pen, e.CellBounds.Right - 1, midY, e.CellBounds.Right - 1, e.CellBounds.Bottom);
e.Graphics.DrawLine(pen, e.CellBounds.Left, e.CellBounds.Bottom - 1, e.CellBounds.Right, e.CellBounds.Bottom - 1); }
e.Handled = true; return; }
} private HeaderGroup FindGroup(int columnIndex) { foreach (var group in _headerGroups) { if (group.Contains(columnIndex)) return group; } return null; }
对了,需要在初始化时关闭关闭自动排序,避免表头绘制错位: foreach (DataGridViewColumn col in dataGridView1.Columns) { col.SortMode = DataGridViewColumnSortMode.NotSortable; col.ReadOnly = false; }
private readonly List<HeaderGroup> _headerGroups = new List<HeaderGroup> { new HeaderGroup("E1", 2, 3), new HeaderGroup("E2", 4, 5), new HeaderGroup("H1/E3", 6, 7), new HeaderGroup("H2/E4", 8, 9), new HeaderGroup("H3/E5", 10, 11), new HeaderGroup("M", 12, 13) };
private readonly string[] _subHeaders = { "", "仪器编号", "线号", "点号", "线号", "点号", "线号", "点号", "线号", "点号", "线号", "点号", "线号", "点号" };
private class HeaderGroup        {            public string HeaderText { get; }            public int StartColumn { get; }            public int EndColumn { get; }
            public HeaderGroup(string headerText, params int[] columns)            {                HeaderText = headerText;                StartColumn = columns[0];                EndColumn = columns[columns.Length - 1];            }
            public bool Contains(int columnIndex)            {                return columnIndex >= StartColumn && columnIndex <= EndColumn;            }        }
dataGridView1.Rows.Clear();
foreach (var kv in list){ Devs dev = kv.Value; int index = dataGridView1.Rows.Add(); DataGridViewRow row = dataGridView1.Rows[index];
row.Cells[1].Value = kv.Key;
SetLinePoint(row, 2, dev.E1); SetLinePoint(row, 4, dev.E2); SetLinePoint(row, 6, dev.H1_E3); SetLinePoint(row, 8, dev.H2_E4); SetLinePoint(row, 10, dev.H3_E5); SetLinePoint(row, 12, dev.M); }
private void SetLinePoint(DataGridViewRow row, int startColumn, int[] values) { if (values == null || values.Length < 2) return; row.Cells[startColumn].Value = values[0]; row.Cells[startColumn + 1].Value = values[1]; }
那我的需求是还需要双击可以编辑单元格,这个也不涉及啥变动,就列出来方便大家复制:private void DataGridView1_CellDoubleClick(object sender, DataGridViewCellEventArgs e) { if (e.RowIndex < 0 || e.ColumnIndex < 0) return; dataGridView1.BeginEdit(true); }
private void DataGridView1_CellFormatting(object sender, DataGridViewCellFormattingEventArgs e) { if (e.RowIndex < 0 || e.ColumnIndex < 2 || e.ColumnIndex > 13) return;
int groupIndex = (e.ColumnIndex - 2) / 2; bool isOddGroup = groupIndex % 2 == 1; bool isEvenRow = e.RowIndex % 2 == 0;
if (isEvenRow && isOddGroup) { e.CellStyle.BackColor = Color.FromArgb(236, 240, 248); } else if (!isEvenRow && isOddGroup) { e.CellStyle.BackColor = Color.FromArgb(246, 248, 252); } else if (isEvenRow) { e.CellStyle.BackColor = Color.FromArgb(247, 247, 250); } else { e.CellStyle.BackColor = Color.White; } }
阅读原文:https://mp.weixin.qq.com/s/0PQnpaFgGTHejE-ZoA919w
该文章在 2026/8/31 18:28:46 编辑过






 400 186 1886